Marble Track Around a Room
These instructions are for building a marble track around the outside of a room.
This track is built mostly from wood and uses 1-inch glass marbles. There are two lifting devices used to bring the marbles to the top of the track and keep them moving around the room. The lifting devices are run with battery packs with AA batteries and small DC gear motors.
This is meant to give someone the general ideas for building this type of marble run, but will not go into the detail to build this exact layout.
I built this for my youngest son and it runs around his bedroom. I love building fun things like this for my kids and seeing their excitement as everything comes together.
Step 1: Tools and Materials You May Need
Materials
The materials and tools you need depends on the type of track you decide to build.
The marbles for this project are 25mm (about 1-inch) in diameter and were purchased in a bulk bag of 125 count. The price was around $40 at the time of purchase.
The gear motors I used were purchased cheaply off Ebay. I was able to get 4 motors for $18.00. I only used two of the motors for the project.
All of the wood I used for the project was material I already had on hand. If I had to estimate, I would say the cost of the wood materials was around $70.
The battery packs that both marble lifters use were purchased at Radio Shack for $2.50 each.
Both lifting devices use several 1/4-inch inner diameter x 5/8-inch outer diameter bearings. These were purchased on Ebay for $10.00.
All wood pieces were finished with MinWax water based Polycrylic in a clear satin finish. This stuff dries amazingly fast if you haven't used it before. Most of the track parts were spray finished. The spray makes it much easier to apply a finish to the odd shaped pieces.
A quart of this in a can cost me $16.57.
I used 4 cans of spray for about $9.00 per can.
The screws used to attached all of the pieces to the walls were #8 by 2-1/2 inch long. They were purchased at a local home improvement store for $3.50 for the bag.
The spring clamps used to clamp the track pieces were also purchased at a local home improvement store for about $30.
Tools
The tools I used on the project were as follows:
- table saw
- band saw
- oscillating spindle and belt sander
- drill press
- cordless drill
- sanding block
- stud finder
- screwdrivers and wrenches
NOTE: If you plan on using any tool for a project please make sure you are familiar with the tool and all of the dangers associated with it. If you are not familiar with a tool then you should ask someone who is to show you the proper way to use it. A lot of communities have classes at local colleges on the proper use of tools and machinery. There are also local woodworking clubs that offer classes at very reasonable rates for beginners. I highly recommend using these resources for your safety and for the most efficient use of the tool.
Step 2: Determine Where the Track Can Go
If you are going to build a track around a room then you need to figure out where the track can go and what wall space you have available.
The best way to do this is to draw all of the walls in the room (side by side) where you plan on building the marble track. This will give you one long picture of the room where you can plan your layout. Draw every door, window, shelf, picture, or anything else that you need to stay away from. You may be surprised how much or how little room you have for the track. This exercise will save you a huge amount of time during construction of the track.
Step 3: Sketch a Rough Track on the Wall Layout
Using the layout for the walls of the room you should roughly sketch where you think the track would best fit on the wall.
You may want to make a small piece of sample track for the sake of figuring out the best slope for the track around the room. If your slope is too flat then the marbles may have a tendency to stop or hangup on the track. If the slope is too steep then the marbles may go too fast and jump off the track when they come to a curve or a small bump (like a joint between track pieces). My track has an average slope of about 3.5%. Some sections are a little flatter and some are a little steeper.
Decide where you would like to add other items of interest to the track. Some of these items may lower the track elevation more than others.
Once you have the rough layout determined it is a good idea to use blue painters tape to mark on the walls where you think the track will be sitting. This will help you visualize if there are conflicts with other items that you haven't thought about yet. A little blue painters tape used up now can save you a lot of time later.
Step 4: Design Your Track Pieces
Design your track pieces for the track materials you are going to use and the size of marbles you plan on using.
Glass marbles tend to vary a great deal in size and smoothness. Marbles that are bigger diameter than the average size are going to roll faster and come off the track easier in curves. Marbles that are smaller diameter than the average size are going to roll a little slower. I recommend using a caliper or a circle tracing template to make sure the marbles you use to design the track and the track elements are consistent in size. Then use these marbles for the track after you complete it. Trust me on this one.
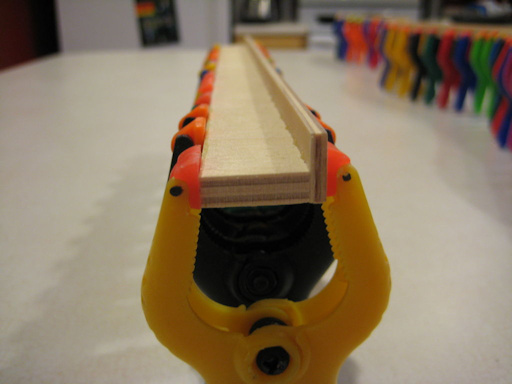
Below is a picture of the track section for this track. Start with a 1/4-inch thick piece of baltic birch plywood that is 3/4-inches wide. Draw the track layout on the piece of wood and then cut it out so it is 3/4-inches wide.
Next you will add the side rails to the track. The sides of the track are 1/8-inch thick baltic birch plywood strips that are 1/2-inch wide. Glue the sides on the center piece one side at a time. You will most likely need a lot of small spring clamps for this operation. The number of clamps you need will depend on the shape and length of the track piece. Luckily these are relatively cheap and easy to find on-line or at home building stores.
Once the glue cures you can remove the clamps and attach the other side.
Once both sides are attached you can again remove the clamps and then sand the bottom of the track smooth.
One note about using 1/8-inch thick baltic birch for the side rails on the track. This section of wood is composed of three plys of wood. If you orient the outside grain of the wood in the up and down direction then you are able to create very tight curves in the track because you are only bending the center ply of wood against the grain. This allows you to get an inside radius on the track as low as a couple inches without having to soften the wood first. I oriented all of the side rails for the track in this direction for uniformity.
Step 5: Design Your Track Supports
Design the type of track supports you want to use. Depending on the size of your room and the number of elements you have in your track this can vary greatly from a little to a lot.
I mounted all of the track supports and elements into wall studs. This can take a little more planning time, but my track remains on the walls with no signs of loose supports or pieces from the vibration of the track. There can be a lot of vibration in the track pieces and elements. This worried me that track supports only attached to drywall would slowly loosen with time and may fall down.
Most of my track supports are identical so the track is spaced off the wall consistently around the room. This also makes cutting out all of the track supports a lot faster since you can make one track support and then use it as a template for remaining pieces.
My track supports are cut out of small scrap walnut pieces and are about 7/8-inch thick.
The track supports are finished with a couple coats of clear polycrylic.
Step 6: Design Your Track Elements
Design the different elements and lifting devices you would like in your marble run. This marble run has two different types of lifting devices and seven other types of track elements.
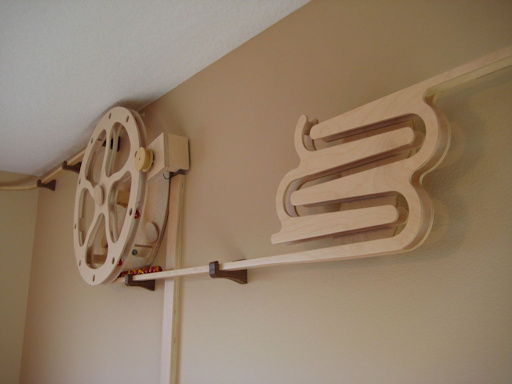
Lifting Device 1 - Wheel Lifter
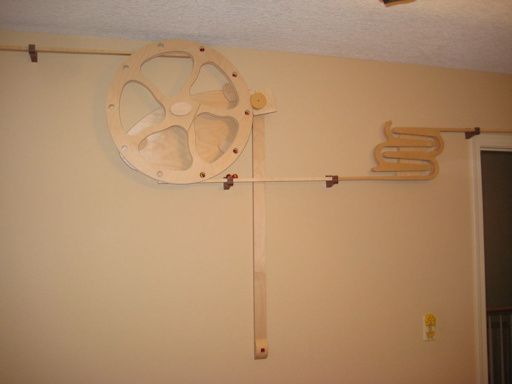
The first lifting device is a large wheel that picks up marbles at the bottom and drops them out at the top. The wheel is actually two wheels with a 3/4-inch spacing between them where the marbles sit.
The wheel is run by a small DC gearmotor and a pack of AA batteries. The motor is controlled by a momentary push button mounted on the wall where my son can reach it. This way the track only runs when someone is holding the button down.
Lifting Device 2 - Stair Lifter
The second lifting device is located on the opposite wall from the first lifter. This one is composed of two sets of steps with one set moving up and down within the other. The whole assembly is sloped forward at 5 degrees to keep the marbles rolling forward when the steps lift the marbles each time.
The stairs are run by the same small DC gearmotor and AA battery pack as the other lifter. The motor for the stairs is controlled in two ways. The first marble that enters the stairs makes a momentary contact that starts the stairs moving. As soon as this happens the stair motion starts moving a wire that moves a wooden wheel. On the back of the wheel are two contact strips that touch a small copper sheet. The copper sheet has a small gap for one of the contacts. When the contact strip hits this small gap the stairs stop until another marble enters the bottom of the stairs.
Track Element 1 - Balls on Track
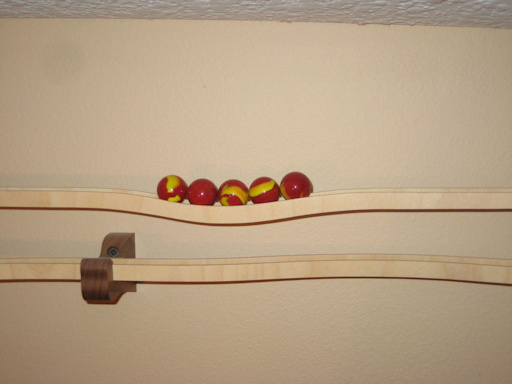
This track section is composed of a slight depression that holds several marbles. When a marble runs into the line of marbles a single marble is ejected from the group on the other end.
Track Element 2 - Tipping Arm
This track section is composed of a tipping arm that has to fill up with five marbles before tipping and dropping the marbles on the track below. The marbles roll uphill until they stop and then continue down the track as a group.
Track Element 3 - Back and Forth drop
One marble is dropped on to the vertical curve and rolls back and forth until it comes almost to a complete stop. It then rolls forward on to a section of track and continues on until it hits the release for the next marble.
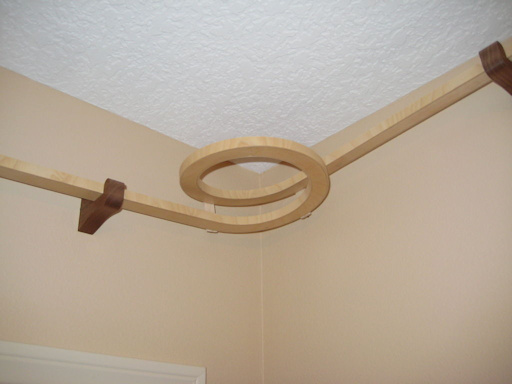
Track Element 4 - Corner Spiral
The corner spiral is a corner piece that has 450 degrees of track curve instead of a regular 90 degree corner piece. The marbles accelerate as they go around the spiral and are a lot of fun to watch.
Track Element 5 - Track Dip
This track element is a vertical dip in the track section. The speed of the marble before and after the dip section is almost identical.
Track Element 6 - Snake Track
This track element is a section of track that meanders from side to side. When looking at this section of track from the side it is almost hard to tell that the track isn't straight.
Track Element 7 - Channel Drop
The channel drop is used to drop the marbles to the elevation of the bottom of the circle lifter. This element really slows down the marbles.
Step 7: Start Building the Parts
Start building the parts. I recommend building the starting lifting mechanism first. This way if you run into any problems or if your measurements are off then you will be able to adjust the rest of the track from the beginning.
I highly recommend not working on parts of the track on all walls at the same time. If you mount track and different elements on the different walls and the tracks don't meet up as you join them together then you may be removing pieces to adjust them up or down. This may mean a lot of wasted time and possible patching of holes in the wall.
One thing you want to watch for is that as you add your track is that the height of the track on the wall is not lower on the wall than what you estimated. This can cause problems as you work your way around the room and you realize that the track is now lower than expected and is now in conflict with doors, windows or other things that you don't or can't move.
Step 8: Install the Lifting Devices and Add Track and Elements
Start installing the marble track by first installing the first lifting device and then add track and elements until you have worked your way around the room.
Keep looking ahead to make sure the track you are installing is not lower then the next lifting device. You don't want to spend a bunch of time designing a lifting device and then have your marble track end up lower than what the lifting device can accept.
One thing that helps in the placement of the track supports is to mark all of the studs in the wall (if you plan on attaching to them) with blue painters tape. This will help you figure out where you want the track and element supports.
Step 9: Enjoy the Finished Marble Track
Now that you have finished installing the marble track you can sit back and enjoy the looks on the kids faces (and adults) that get to enjoy the track. This is a very satisfying thing when you are building something like this for your son or daughter. My son almost always has to run the track at night as he lays down to go to bed.
You may find that the track needs a bit of fine tuning from time to time. It usually isn't a big deal and most of the time the only maintenance you will need to do is replacing batteries. I find that I need to replace batteries about every 4 or 5 months.
If you don't have a room where you can run a track around the entire perimeter of the room you can always build a smaller marble track. Here is a video of one I built for my other son.
